Skip to content

Category: Coding

Laravel 9: avoid to use `Storage::exists()`

I use Storage facades to manage my Laravel application files and folder a lot, either on server storage or S3 compatible storage like DigitalOcean Spaces.

Recently I have a new microservice project kicked start and using Laravel 9, and I use the Storage facades as same as I did in previous projects.

So this time I need to use Storage::exists() to check if a file exists in a huge size of DigitalOcean Spaces (around 300GB). But the speed is pretty slow, sometimes it takes 3 seconds, but sometimes it can take more than 10 seconds for a single file check.

This problem happened quite randomly because I use the same method to check in my old projects running with other Laravel versions doesn’t have such a problem. Even if I use another S3 client also couldn’t reproduce the slowness, thus I decided to dig in and see what was going on.

End up I found this in FilesystemAdapter.php:

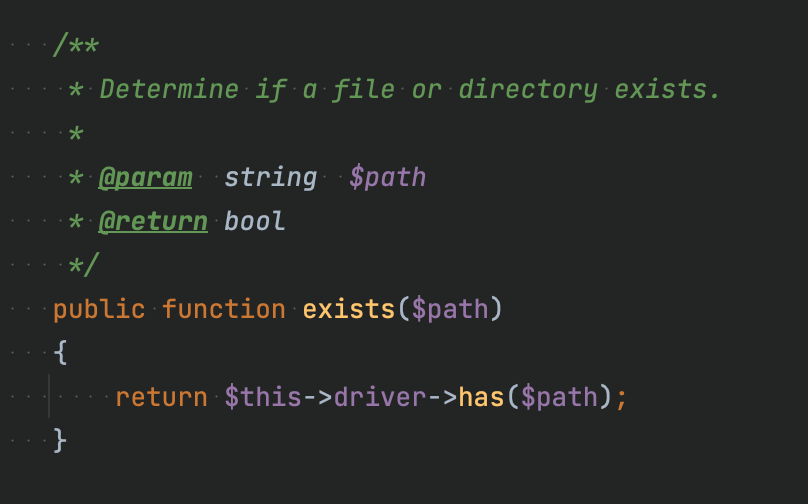
This leads me to the driver League\Flysystem\Filesystem , and I can see the implementation of has() function like the following:

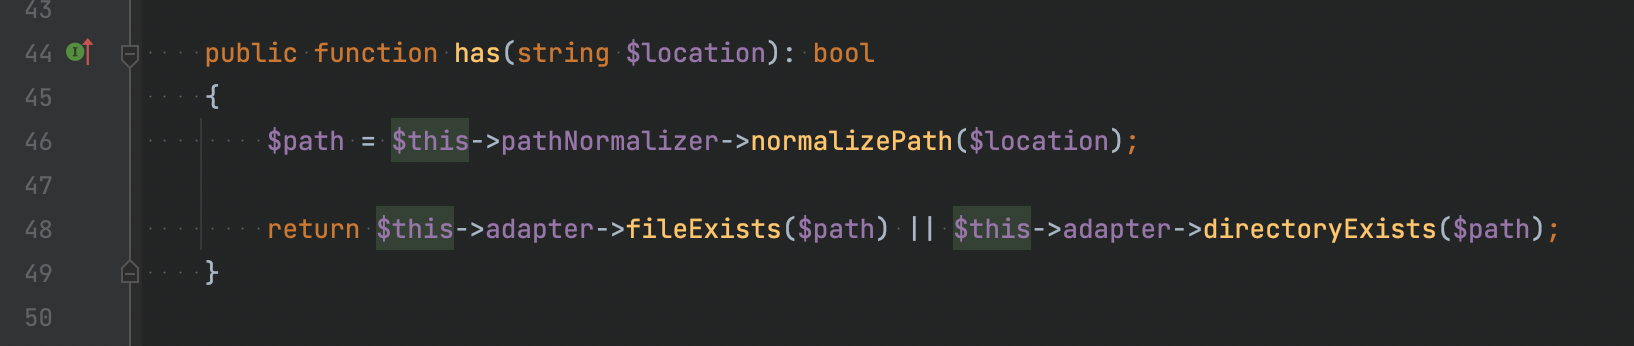
And YES. This explains why the checking of a single file takes longer than expected.

Workaround

Use Storage::disk('s3')->fileExists($path) to check the file directly.

It avoids the calling to directoryExists($path) , which probably causes slowness on a huge side S3 storage.

Leave a Comment

Containerize old PHP/Laravel application with Apache and SSL

Recently I migrated my websites and some applications from 7 years old server to a new server. Then I just realize some PHP application is not working on the latest PHP 7.4, thus I have to create a simple docker container to run the app.

Specifically, it’s Invoice Ninja v3.4.1.
This application was running on my server for more than 5 years.
Because I’m too lazy to upgrade to the latest version manually, so I think letting it run in a container with a specific PHP version will be good enough for me.

Following is my Dockerfile:

# use any php version as u need
FROM php:7.0.33-apache

# install any php extension as u need
RUN docker-php-ext-install pdo_mysql mysql

# install ssl-cert for generate self-signed cert
RUN apt-get update && apt-get install -y ssl-cert

# enable apache2 mod
RUN a2enmod rewrite
RUN a2enmod ssl

# simple virtualhost definition
RUN echo '\n\
<VirtualHost *:443>\n\
  <Directory /srv>\n\
    Options Indexes FollowSymLinks\n\
    AllowOverride All\n\
    Require all granted\n\
  </Directory>\n\
  DocumentRoot /srv/public \n\
  SSLEngine on \n\
  SSLCertificateFile  /etc/ssl/certs/ssl-cert-snakeoil.pem \n\
  SSLCertificateKeyFile /etc/ssl/private/ssl-cert-snakeoil.key \n\
</VirtualHost>\n'\
> /etc/apache2/sites-available/000-default.conf

WORKDIR /srv

CMD ["apache2-foreground"]

With this Dockerfile:
1. install PHP extension to run the applications.
2. it has a self-signed certificate to enable simple SSL.
3. it allows us to mount any kind of PHP application and use it immediately.

To run the application with this Dockerfile:
1. Put the Dockerfile in your application root directory.

2. Build the image:
docker build -t YOUR-APPLICATION-IMAGE:custom .

3. Run the container with the image and mount the application directory to container’s /srv:
docker run --rm --name CONTAINER_NAME -v /path/to/your/application YOUR-APPLICATION-IMAGE:custom

That’s all~
With this trick, you should be able to run any web applications that require PHP version less than 7.4

Leave a Comment

Install PHP Xdebug on M1 Macbook Pro

Installing Xdebug on M1 MacBook Pro can be very tricky due to the CPU architecture changed.

This post will show how I install it on my machine:

  1. Make sure you install ur PHP through brew. For me, I have PHP v7.4.15 and perl v5.30.2 installed
  2. Install Xdebug with perl:
    arch -arm64 sudo pecl uninstall xdebug
  3. Locate the Xdebug path in your system. For me, it’s installed on /opt/homebrew/Cellar/[email protected]/7.4.15_1/pecl/20190902/xdebug.so
  4. Make sure xdebug.so is loaded correctly in php.ini. You can check the following block.
zend_extension="/opt/homebrew/Cellar/[email protected]/7.4.15_1/pecl/20190902/xdebug.so"
xdebug.mode=debug
xdebug.client_host=localhost
xdebug.client_port=9000

DONE~
You may start using Xdebug to debug ur PHP application. =)

1 Comment

Upgrade PHP 5.5 to 7.0 on Ubuntu 14.04

PHP 7.0 just released 2 weeks ago, and it has good reviews about performance improved a lot. So I would like to give it a try, upgrading my Ubuntu 14.04 VPS on DigitalOcean to this latest PHP version.  Here is my upgrade snippet.

My VPS details before upgrade:
  • Ubuntu 14.04
  • PHP 5.5.9
  • nginx 1.4.6
  • phpmyadmin installed
Steps
  1. Add the repository
    add-apt-repository ppa:ondrej/php-7.0
  2. Update
    apt-get update
  3. You can check installed php5-* packages with this command, for better understanding before remove them.
    dpkg --get-selections | grep php
  4. Remove all php5-* packages
    apt-get purge php5-*
    apt-get --purge autoremove
  5. Install php7.0 packages. Some might not necessary, depends on your requirement.
    apt-get install php7.0-fpm php7.0-mysql php7.0-cli php7.0-common php7.0-json php7.0-opcache
  6. After everything installed properly, you will need to update your web server configuration. For me, I need to modify fastcgi_pass directive in Nginx config file to something like this:
    fastcgi_pass unix:/run/php/php7.0-fpm.sock;
    

    This is because the location of socket file has changed in php7.

  7. Restart your nginx and php7.0-fpm
    service nginx restart
    service php7.0-fpm restart
Notes:
  • Run all commands with sudo or your root account.
  • phpMyAdmin will be removed during the steps above. Because it requires some php5 packages.
Leave a Comment

Setup SFTP for a user to access restricted folder only on Ubuntu 14.04

Today I need to give my friend access to my server, so he can edit any files in that folder. My server is running OpenSSH and SFTP is enabled by default, actually I can create a new Linux user for him to access with SFTP. But I just want he accessing to the folder I gave him, so here I modify OpenSSH configuration to fit my need.

System details:

  • Ubuntu 14.04
  • Running OpenSSH

Steps:

  1. Add a group called sftp.
    sudo addgroup sftp
  2. Add new user with default home path, assign to sftp group and disable shell access.
    sudo useradd -m -g sftp -s /bin/false username
  3. Give a new password for the user.
    sudo passwd username
  4. Change home directory’s user and group to root.
    sudo chown root:root /home/username
  5. Change home directory’s permission
    sudo chmod 755 /home/username
  6. Go into the folder
    cd /home/username
  7. Create a new folder named www.
    sudo mkdir www
  8. Change www folder’s user and group to username.
    sudo chown username:username www
  9. This step is the core. Edit to /etc/ssh/sshd_config with the editor you used to.
    sudo nano /etc/ssh/sshd_config
  10. Add following lines to the end of  /etc/ssh/sshd_config.
    Match group sftp
    	ChrootDirectory %h
    	X11Forwarding no
    	AllowTcpForwarding no
    	ForceCommand internal-sftp
    	# PasswordAuthentication yes

    Enable PasswordAuthentication by uncomment it if you enabled PubkeyAuthentication for other users in sshd_config.

  11. Restart ssh service. Done.
    sudo /etc/init.d/ssh restart


Leave a Comment